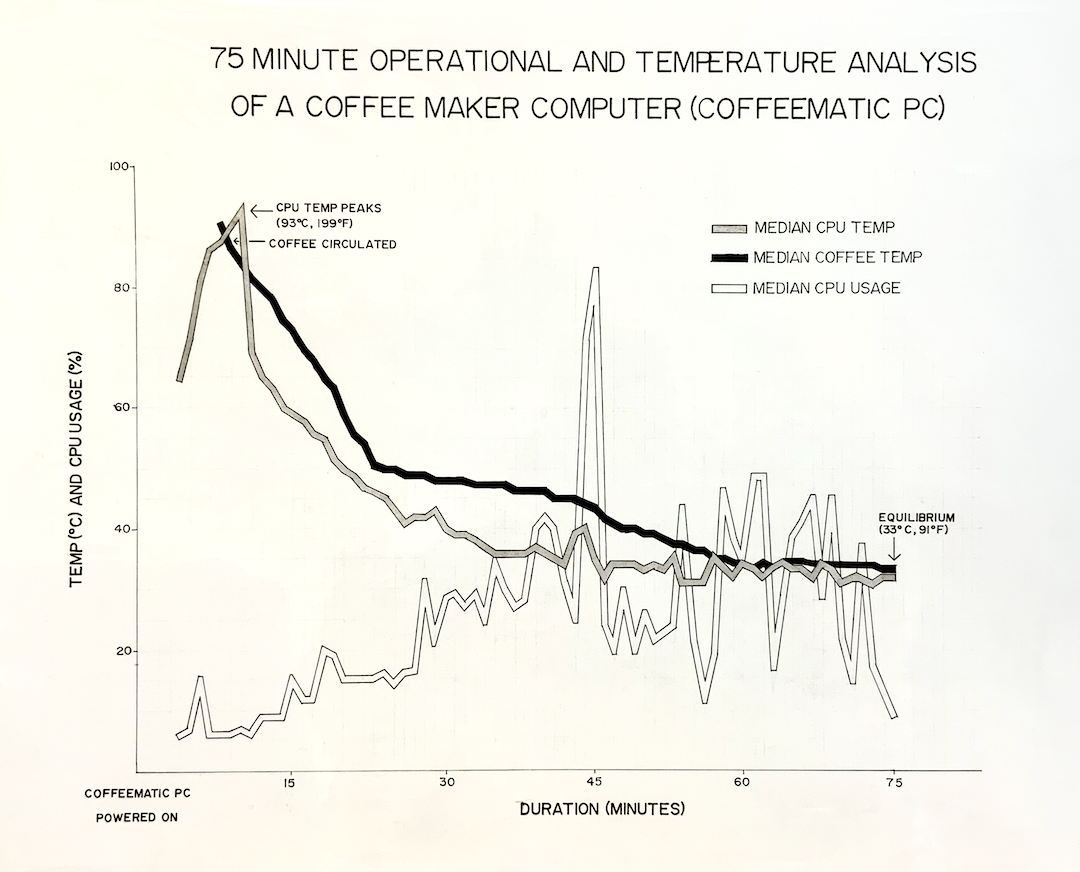
You don’t have to be a Snow Crash or Tron fan to be familiar with the 3D craze that characterized the rise of the Internet and the World Wide Web in particular. From phrases like ‘surfing the information highway’ to sectioning websites as if to represent 3D real-life equivalents or sorting them by virtual streets like Geocities did, there has always been a strong push to make the Internet a more three-dimensional experience.
This is perhaps not so strange considering that we humans are ourselves 3D beings used to interacting in a 3D world. Surely we could make this fancy new ‘Internet’ technology do something more futuristic than connect us to text-based BBSes and serve HTML pages with heavily dithered images?
Enter VRML, the Virtual Reality Modelling Language, whose 3D worlds would surely herald the arrival of a new Internet era. Though neither VRML nor its successor X3D became a hit, they did leave their marks and are arguably the reason why we have technologies like WebGL today.
Inspired By Wheels
 View of CyberTown’s VRML-based Plaza and interface.
With an internet-based virtual reality a highly topic concept, David Raggett from Hewlett Packard Laboratories submitted a paper back in 1994 titled Extending WWW to support Platform Independent Virtual Reality. This imagined a virtual reality layer to the WWW by the end of the millennium featuring head-mounted displays (HMDs) and tracking of a user’s limbs to fully integrate them into this virtual world with potentially realistic physics, sound, etc.
Describing these virtual worlds would be at the core of this VR push, with SGML (standardized general markup language) forming the basis of such world definitions, much like how HTML is a specialized form of SGML to define the structure and layout of a document. The newly minted VRML would thus merely define 3D worlds rather than 2D documents, with both defining elements and their positioning.
Although nothing revolutionary by itself – with games and 3D modeling software by then having done something similar with their own file formats to define 3D models and worlds for years already – VRML would provide a cross-platform, fully open and independent format that was specifically made for the purpose of this online VR experience.
All Starts With Polygons
The interesting thing about VRML is perhaps that it was pushing for a shared online 3D experience years before the first commercially successful MMORPG came onto the scene in 1999 in the form of EverCra^WEverQuest. VRML was pitched in 1994 and by 1995 the very RPG-like MMO experience called Colony City (later CyberTown) was launched. This created a virtual world in which members could hold jobs, earn virtual currency and purchase 3D homes and items that were all defined in VRML.
CyberTown endured until 2012 when the company behind it shut down, but there’s an ongoing push to revive CyberTown, with the revival project‘s GitHub project giving a glimpse at the preserved VRML-based worlds such as the home world. These .wrl files (short for ‘world’) use the VRML version 2.0 standard, which was the 1997 version of VRML that got turned into an ISO standard as ISO/IEC 14772:1997, with the specification itself being readily available over at the Web3D website.
As defined in part 1 of the specification, each VRML file:
implicitly establishes a world coordinate space for all objects defined in the file, as well as all objects included by the file;explicitly defines and composes a set of 3D and multimedia objects;can specify hyperlinks to other files and applications;can define object behaviors.
VRML got combined with the Humanoid Animation (HAnim) standard to make realistic humanoid articulation and movement possible. Much like HTML documents, it are often the external resources like textures that determines the final look, but basic materials can be defined in VRML as well.
A very basic example of VRML is provided on the Wikipedia entry for a simple triangle:
#VRML V2.0 utf8
Shape {
geometry IndexedFaceSet {
coordIndex [ 0, 1, 2 ]
coord Coordinate {
point [ 0, 0, 0, 1, 0, 0, 0.5, 1, 0 ]
}
}
}
The interesting part comes when the material and texture appearance properties are set for a shape, albeit with basic lighting, no shaders and similar advanced features. All of these would see major improvements by the late 90s as consumer graphic cards became commonplace, especially during 1999 when we saw not only NVidia’s impressive RIVA TNT2, but especially its revolutionary Geforce 256 GPU with its hardware transform and lighting engine.
At this point video games began to look ever more realistic – even on PC – and with the release of new MMORPGs like 2004’s World of Warcraft and EverQuest II, the quirky and very dated look of VRML-based worlds made it clear that the ‘3D WWW’ dream in the browser was effectively dead and the future was these MMORPGs and kin.
It also seems fair to say that the fact that these games came with all of the assets on installation discs was a major boon over downloading hundreds of megabytes worth of assets via an anemic dial-up or crippled cable internet connection of the late 90s and early 2000s.
A Solution In Search Of A Problem
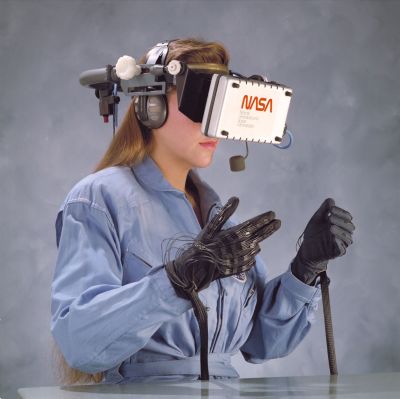 Virtual Environment Reality workstation technology in 1989 (helmet & gloves) (Credit: NASA)
One could argue that science-fiction like Snow Crash provides us with the most ideal perspective of a VR layer on top of the Internet, where its Metaverse provides a tangible addition to reality. This same concept of a metaverse where the mind is no longer constrained by the limitations of the body is found in animated features like Ghost in the Shelland Serial Experiments Lain, each of which feature digitalized, virtual worlds that unchain the characters while creating whole new worlds previously considered impossible.
In these worlds characters can find information much faster, move through digital currents like fish in water, inhibit the digital brains of Internet-connected devices, and so on. Meanwhile back in reality the way we humans interact with virtual worlds has barely changed from the 1980s when NASA and others were experimenting with VR interface technologies.
Why move clumsily through a faux 3D environment with cumbersome input devices strapped to your body and perhaps a display pushed up to your noggin when you can just use mouse and keyboard to tappity-tap in some commands, click a hyperlink or two and observe the result on your very much 2D monitor?
As around 2003 the latest web-based VR world hype came in the form of Second Life, it followed mostly the same trajectory as CyberTown before it, while foregoing anything like VRML. After some companies briefly had a presence in Second Life before leaving, it became a ghost town just in time for Facebook to rename itself into Meta and try its hand at the very creatively named Metaverse. Despite throwing billions of dollars at trying to become at least as popular as CyberTown, it mostly left people with the feeling of what the point of such a ‘metaverse’ is.
Never Stop Dreaming
The Web3D Consortium was set up in 1997 along with the standardization of VRML, when it was called the VRML Consortium. Its stated goal is to develop and promote open standards for 3D content and services on the web. It currently pushes the somewhat newer X3D standard, which among other things supports multiple syntax types ranging from XML to classical VRML. It also supports modern physically based rendering (PBR), which puts it at least somewhat in the same ballpark as modern 3D graphic renderers.
Meanwhile there is the much more significant WebGL, which was originally created by Mozilla, but has since found a loving home at Khronos. This uses the canvas feature of HTML 5 to render 2D and 3D graphics using OpenGL ES, including support for shaders. The proposed WebGPU would merge the web browser and GPUs tighter still, albeit with its own shader language instead of the standard OpenGL ES one.
With these new technologies it would seem that rendering prettier 3D worlds in browsers has become easier than ever, even as the dream of bringing 3D worlds to the WWW seems as distant as the prospect of VR games taking the world of gaming by storm. Barring major human-computer interface advances, the WWW will remain at its optimum with keyboard and mouse, to browse through 2D documents. This alongside 3D game worlds controlled with the same keyboard and mouse, with said worlds rendered on a very much 2D surface.
Here’s to dreaming that maybe some of those exciting aspects of sci-fi will one day become science-fact, and to those who strive to make those dreams reality, in lieu of simply being given a nanotech-based Primer as a shortcut.
From Blog – Hackaday via this RSS feed

 Eventually [Erich] will have enough clocks for Bad Apple, but this version can do short text strings among many other effects. Check his blog for more demo videos.


